


How to Create a New User ID in zSecure by Copying an Existing ID
How to Create a New User ID in zSecure by Copying an Existing ID
If you're new to mainframe security, provisioning IDs is one of the first tasks you'll encounter. Luckily, tools like zSecure make this process simpler by eliminating the need to input RACF commands manually in ISPF Option 6. With zSecure, creating new IDs is not only easy but efficient—and by the end of this tutorial, you’ll be able to do it with confidence.
In this guide, we’ll walk through how to create a new user ID by copying an existing one. This approach is particularly helpful when a new team member needs the same access as their colleagues. It also allows administrators to specify additional settings, such as OMVS segments, if required. Let’s get started!
Prerequisites Before proceeding, ensure you have the necessary access to use zSecure Admin+Audit features. Specifically, you’ll need SPECIAL authority, which allows you to create, modify, or delete profiles and system settings in the RACF database.
Step-by-Step Instructions
- Open zSecure Start by opening zSecure. Type the following command from the TSO prompt:
TSO CKR
Press [Enter]

- Access the User Administration Menu Type the following command and press [Enter]:
RA.U
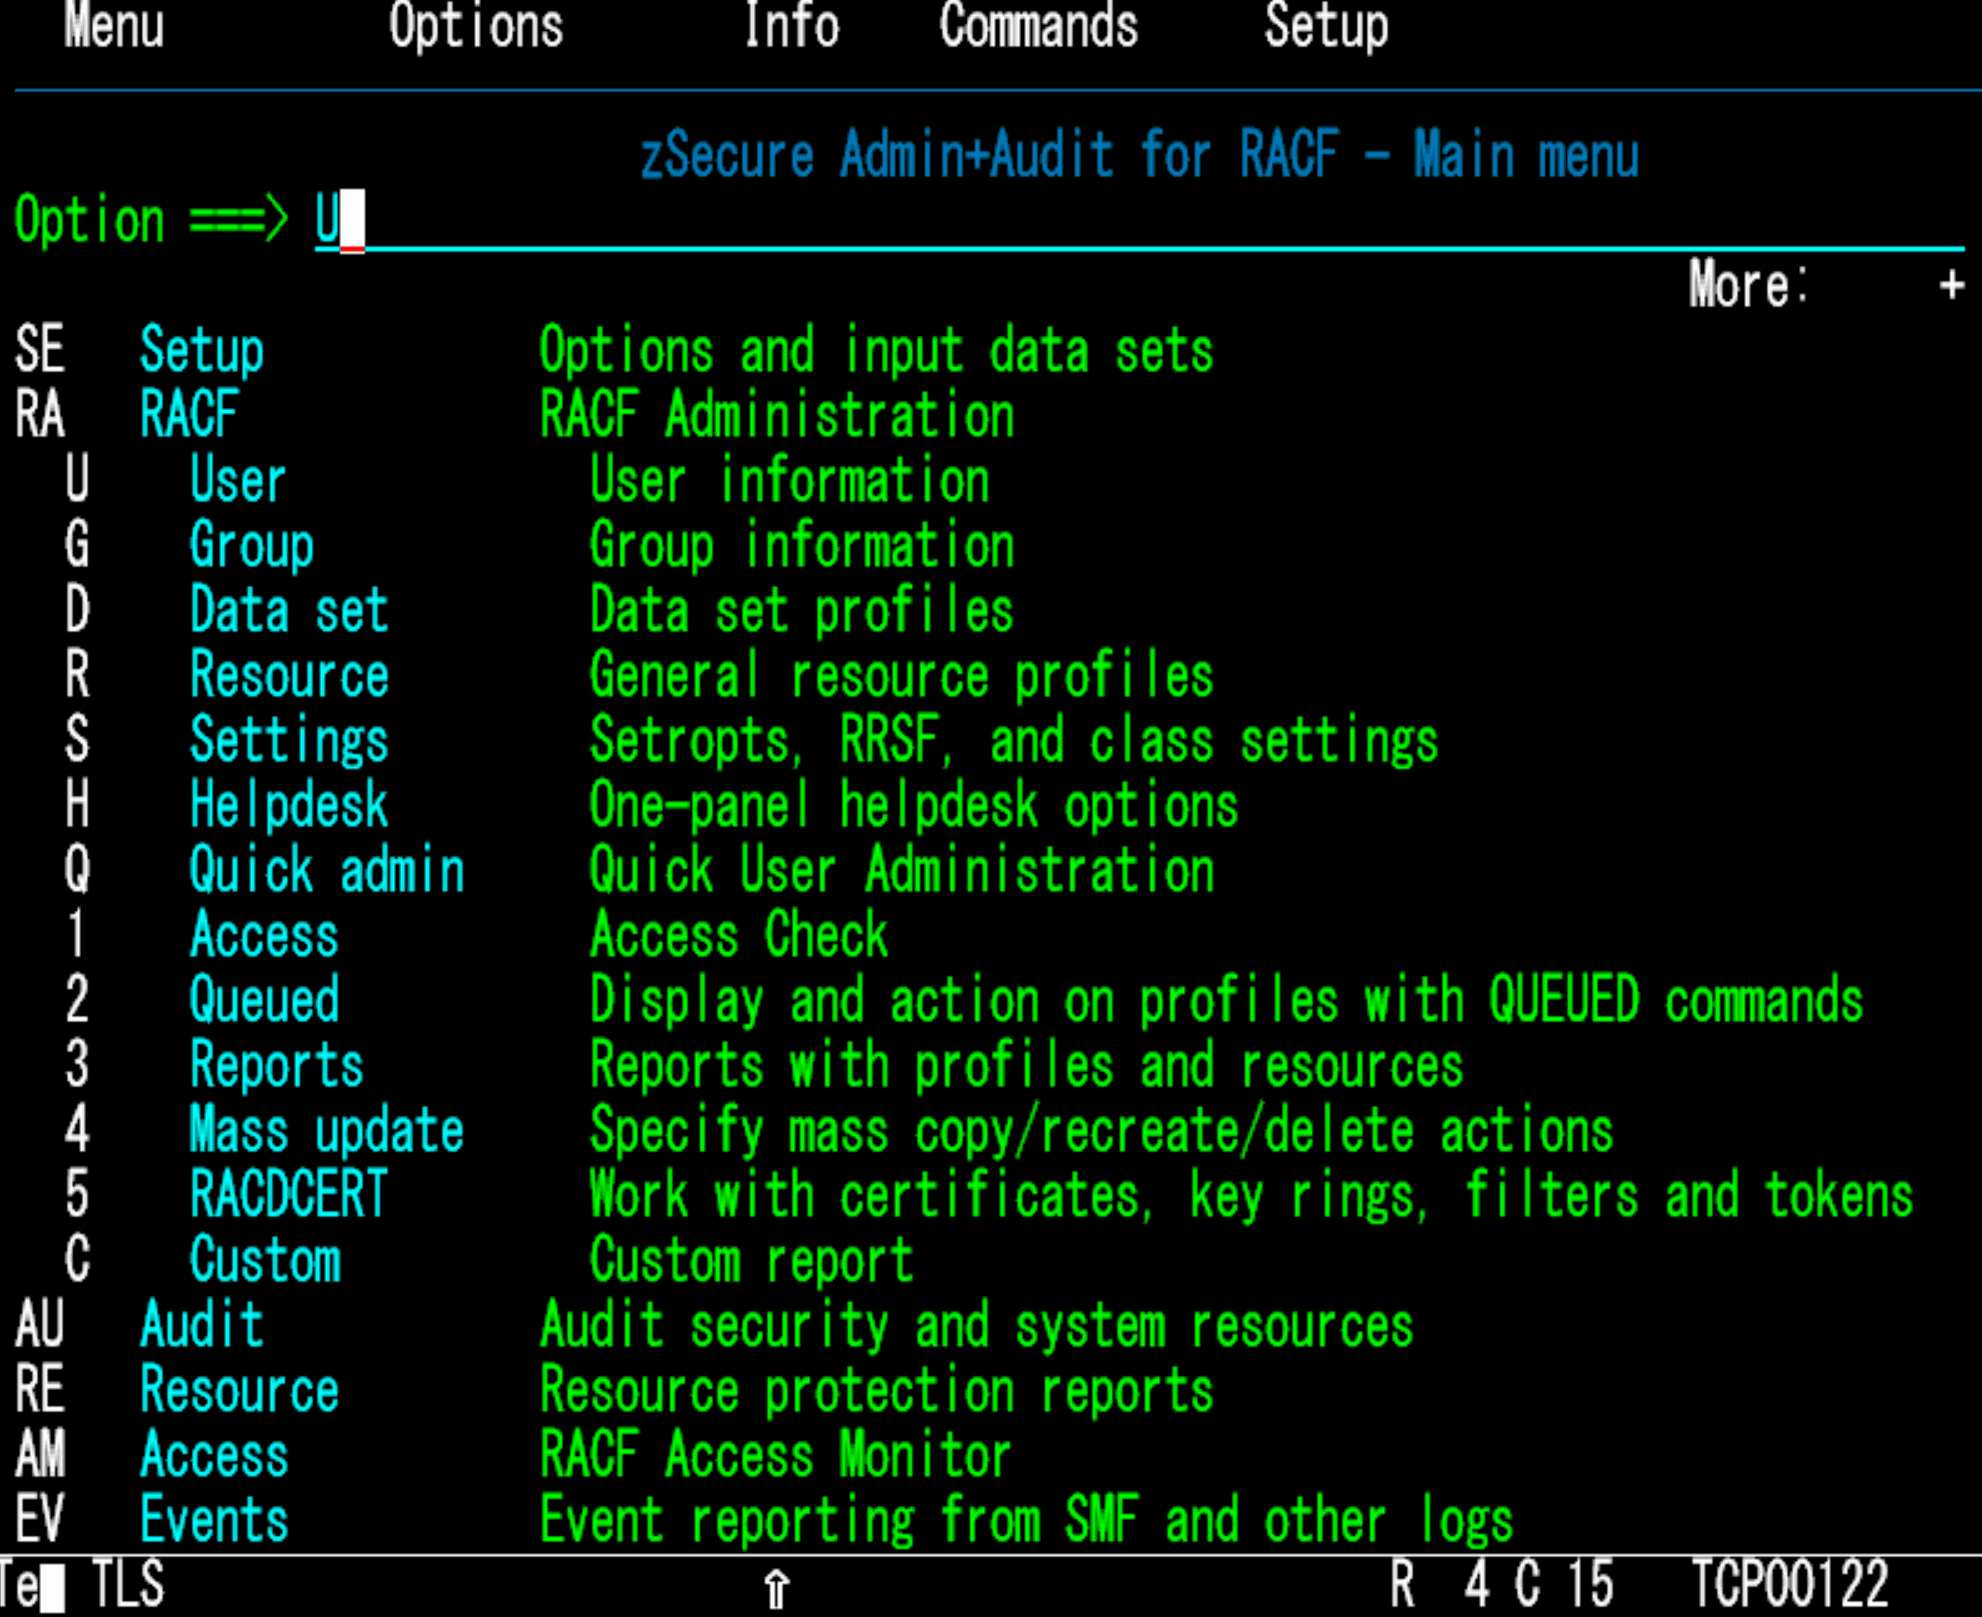
This will take you to the user administration menu.
Search for the User to Copy On this screen, search for the user ID you want to mirror. You can search by user ID, name, or both. After entering your search criteria, press [Enter] to view the user ID details.

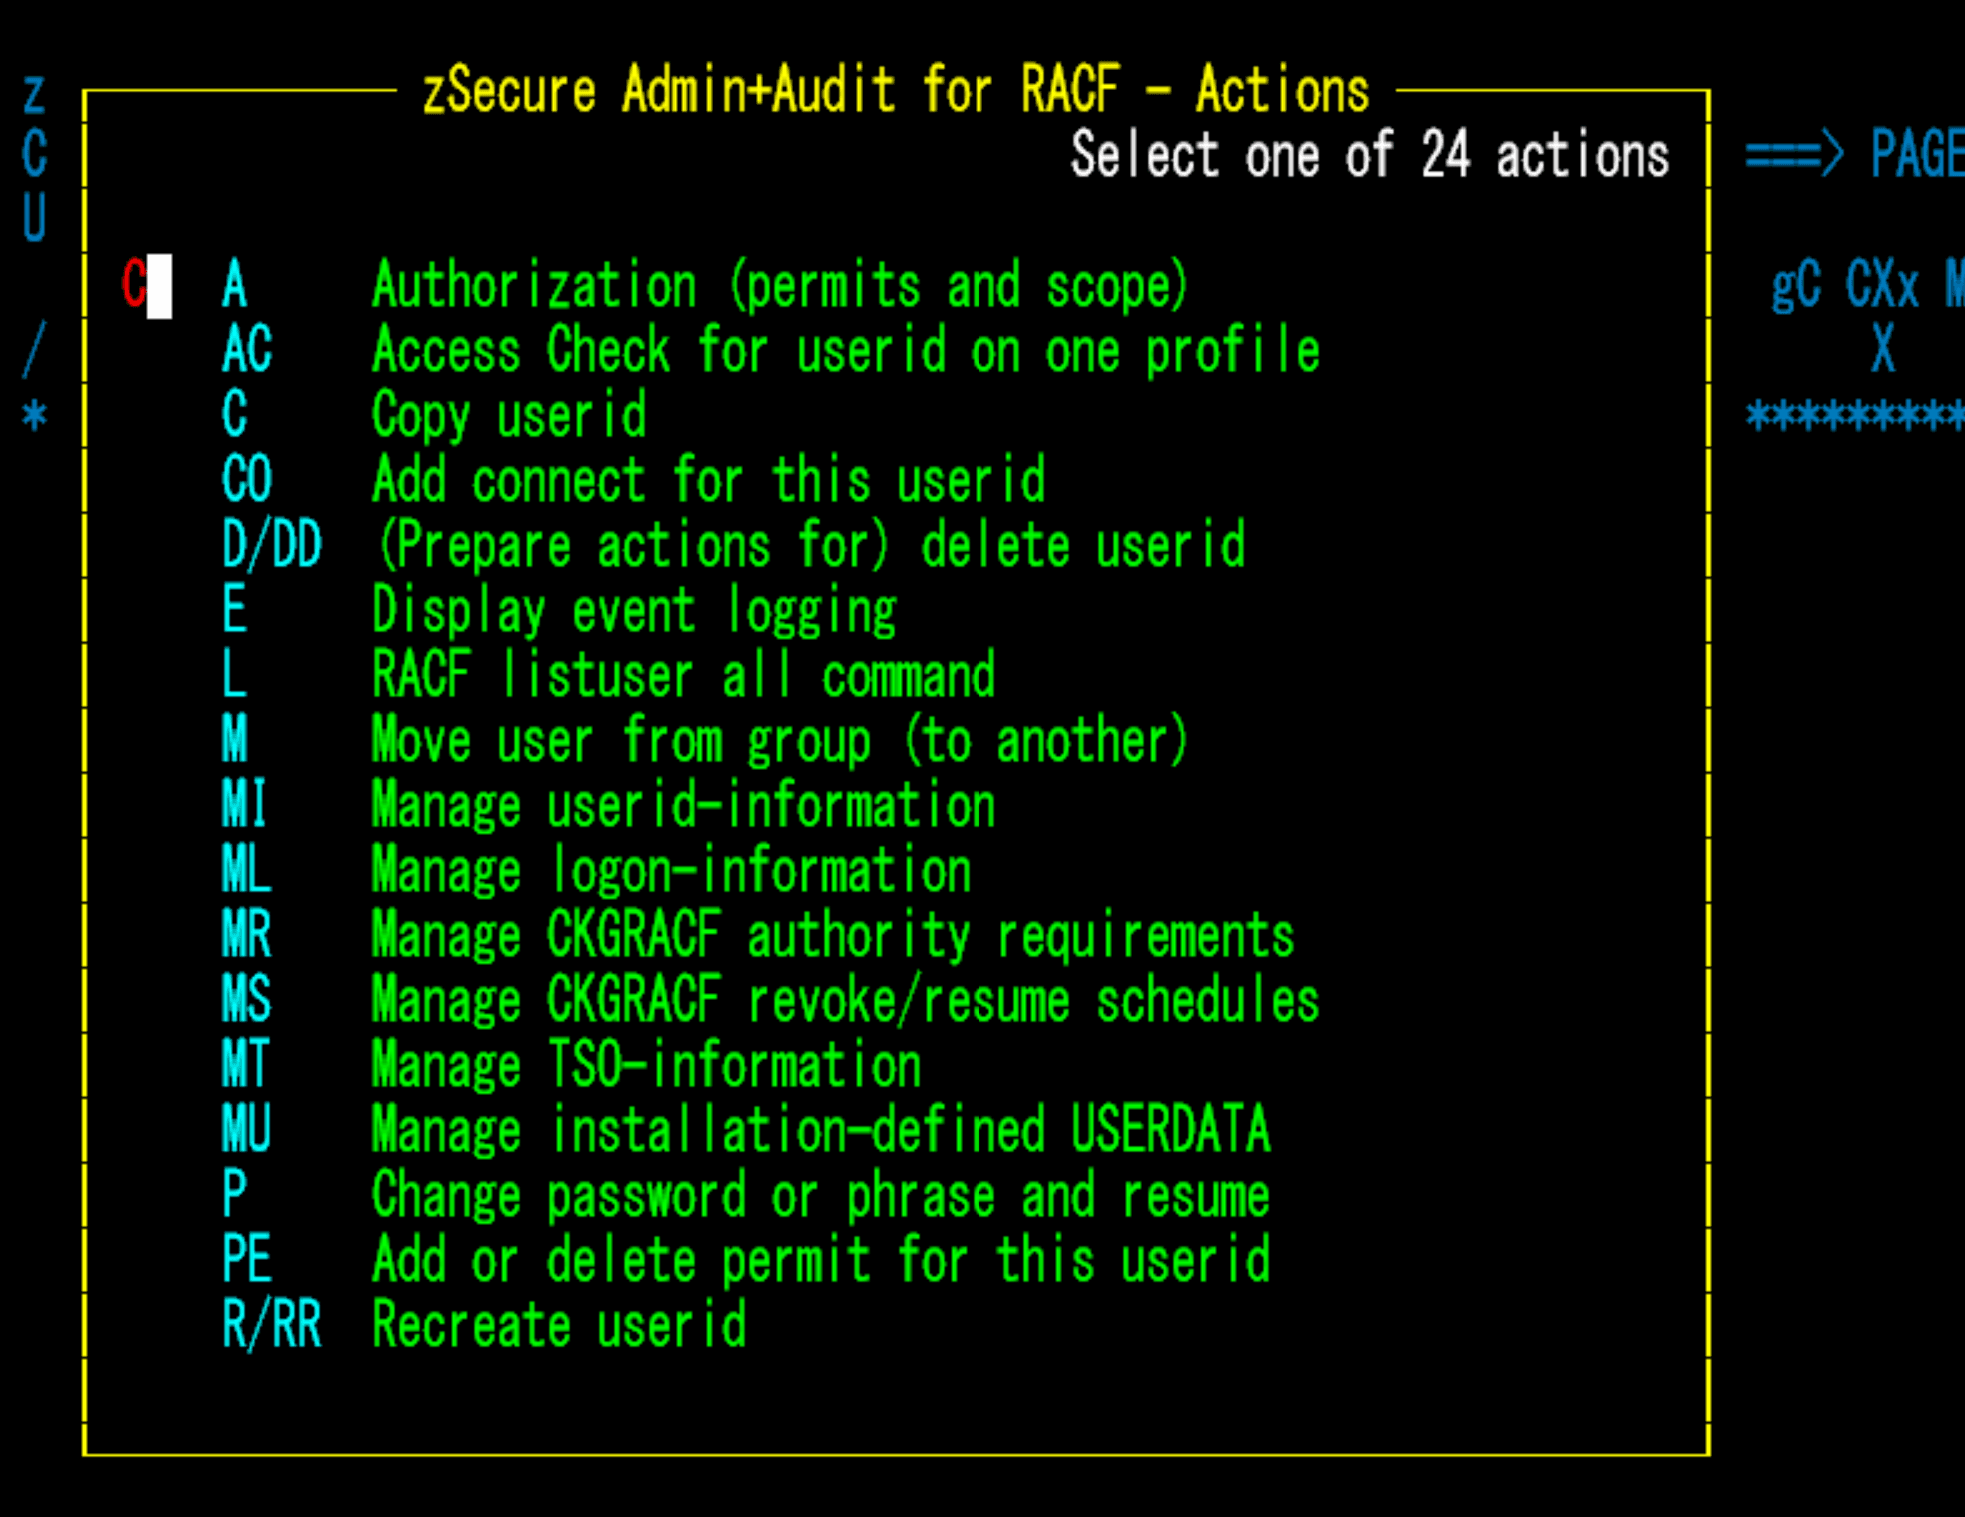
Copy the User ID When the user ID overview appears, type a forward slash (/) next to "User" to see available options. Select 'C' to copy the user ID.

Define the New User ID You’ll be taken to a screen where you can input the new user ID and the user’s name. For example:
New User ID: B000002 Name: Dinoframe User Authentication Settings
Depending on your organization’s standards, define the authentication method and initial password. For example:
Authentication: 1 (to enable password entry) Password: 11111111 (temporary password) ⚠️ Note: Always follow your organization’s password policies. As of this writing, PCI standards require a minimum of 8 characters for passwords.
Additional Options The lower portion of the screen includes several options for copying user data. To understand an option, tab to the input line and press PF1 for detailed information. For this tutorial, we will use the following options:
Copy USERDATA and CUSTOMDATA
Specify Values for Segment Data
Issue ADDSD/RDEF for dataset and resource profiles related to the user
Copy catalog aliases (requires CKFREEZE)

Press [Enter] to proceed.
Define OMVS Settings (Optional)
If the user requires OMVS or home directory access, you’ll define it on the next screen. For this tutorial, we’ll skip this step by selecting 1 to indicate no OMVS setup. (I will cover this in another tutorial :) )
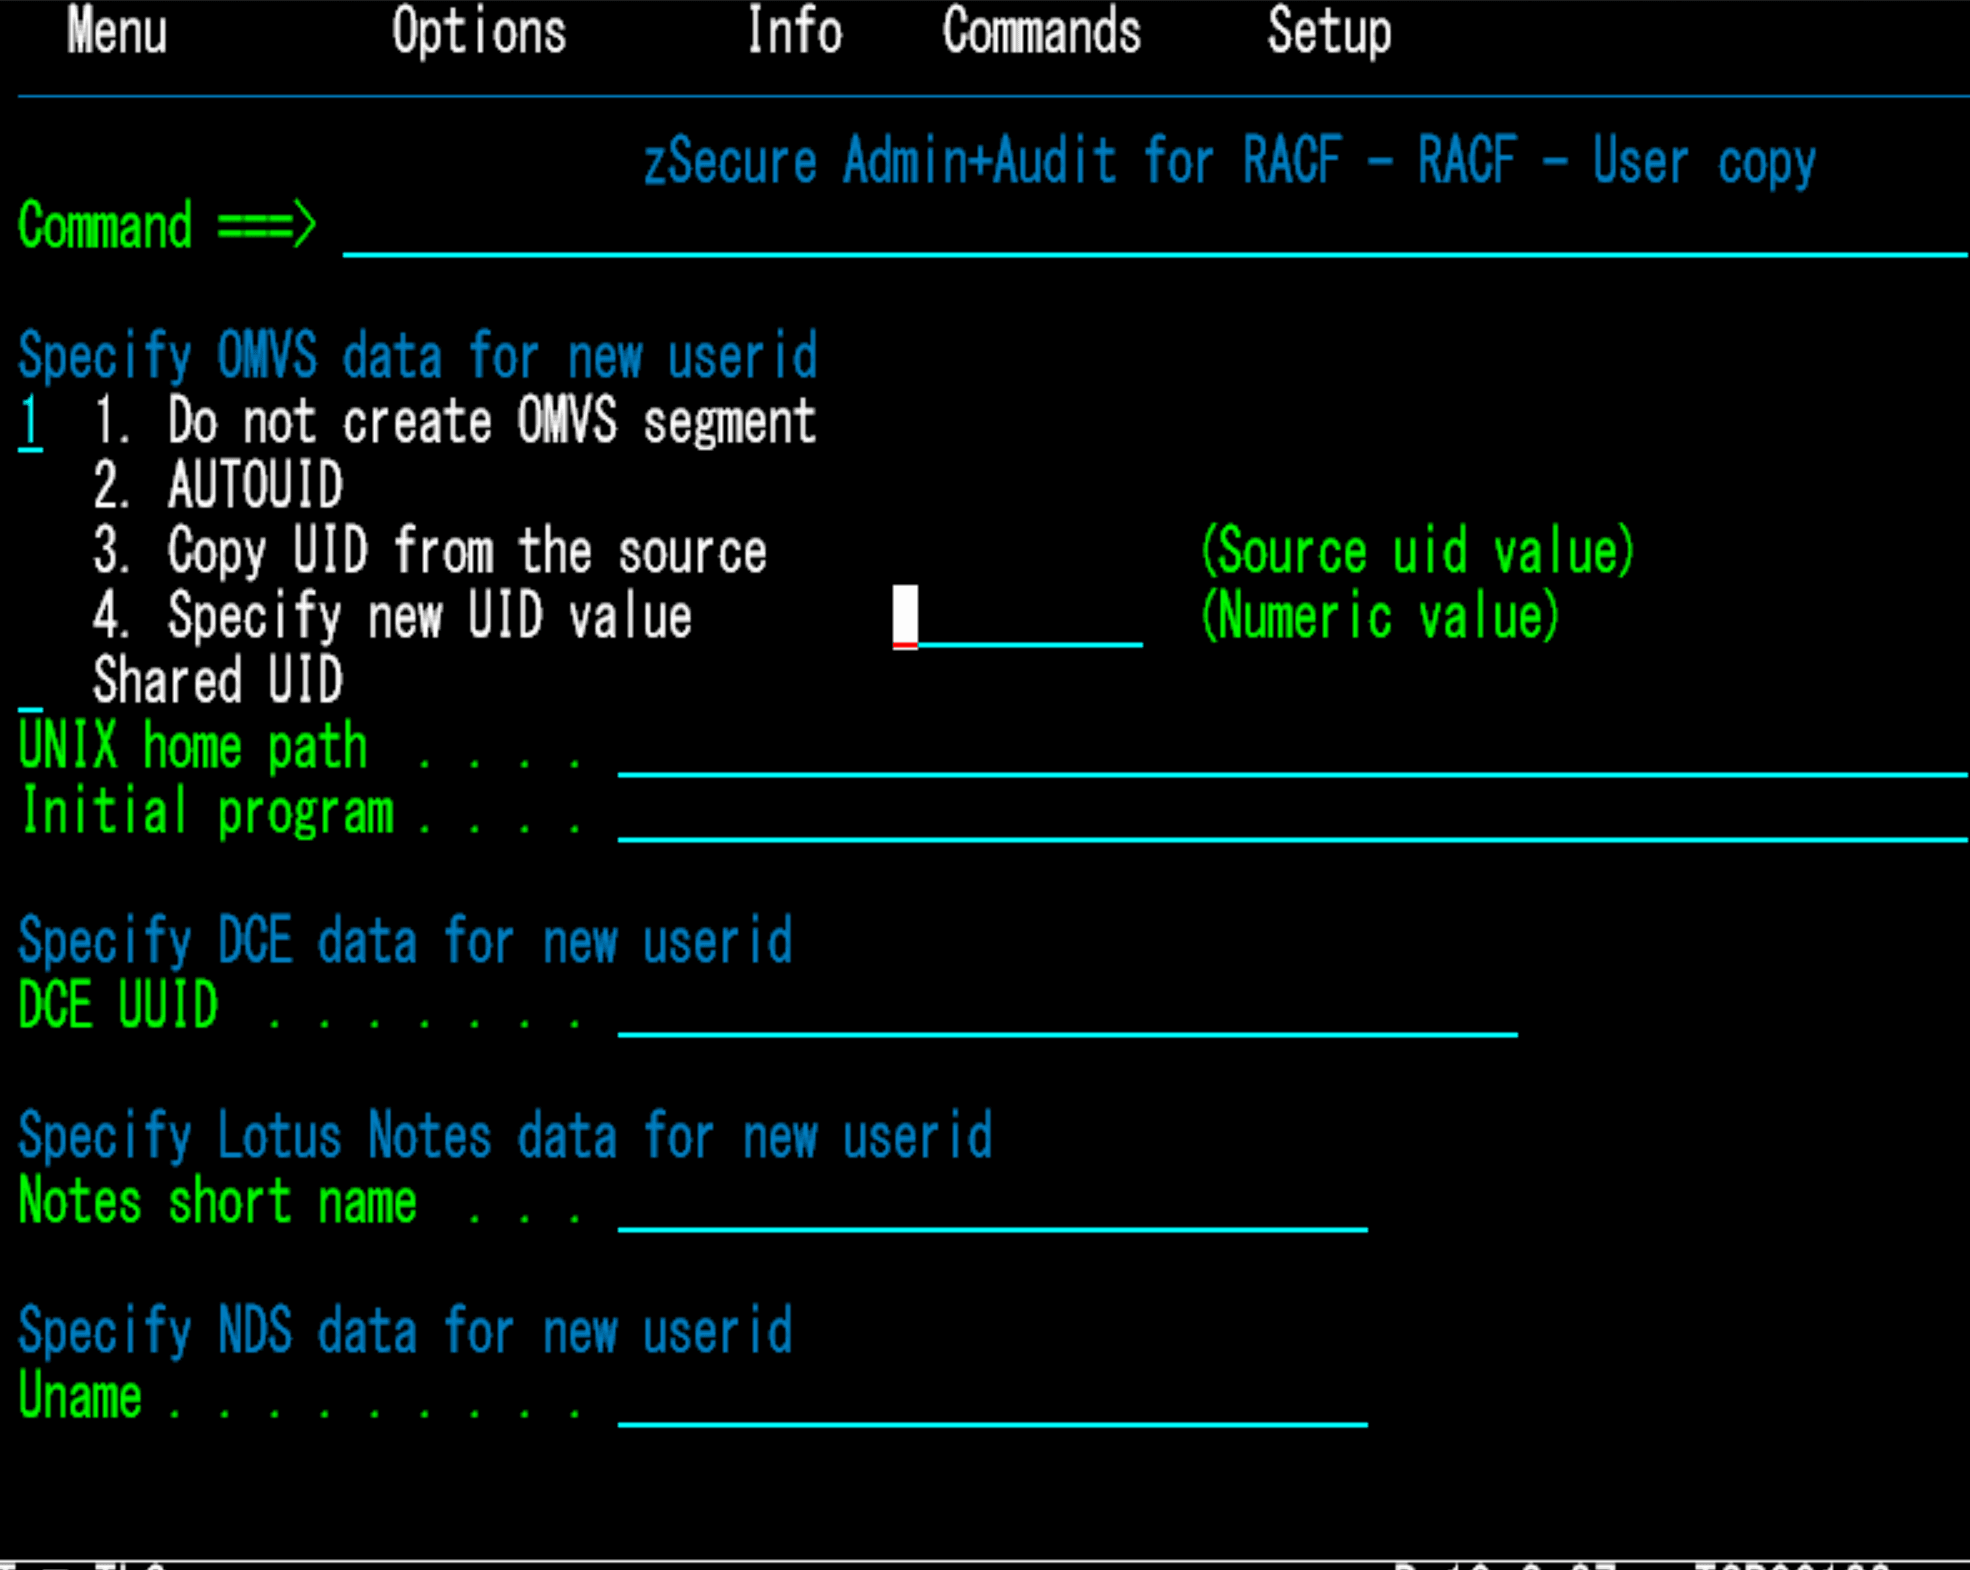
Press [Enter] to continue.
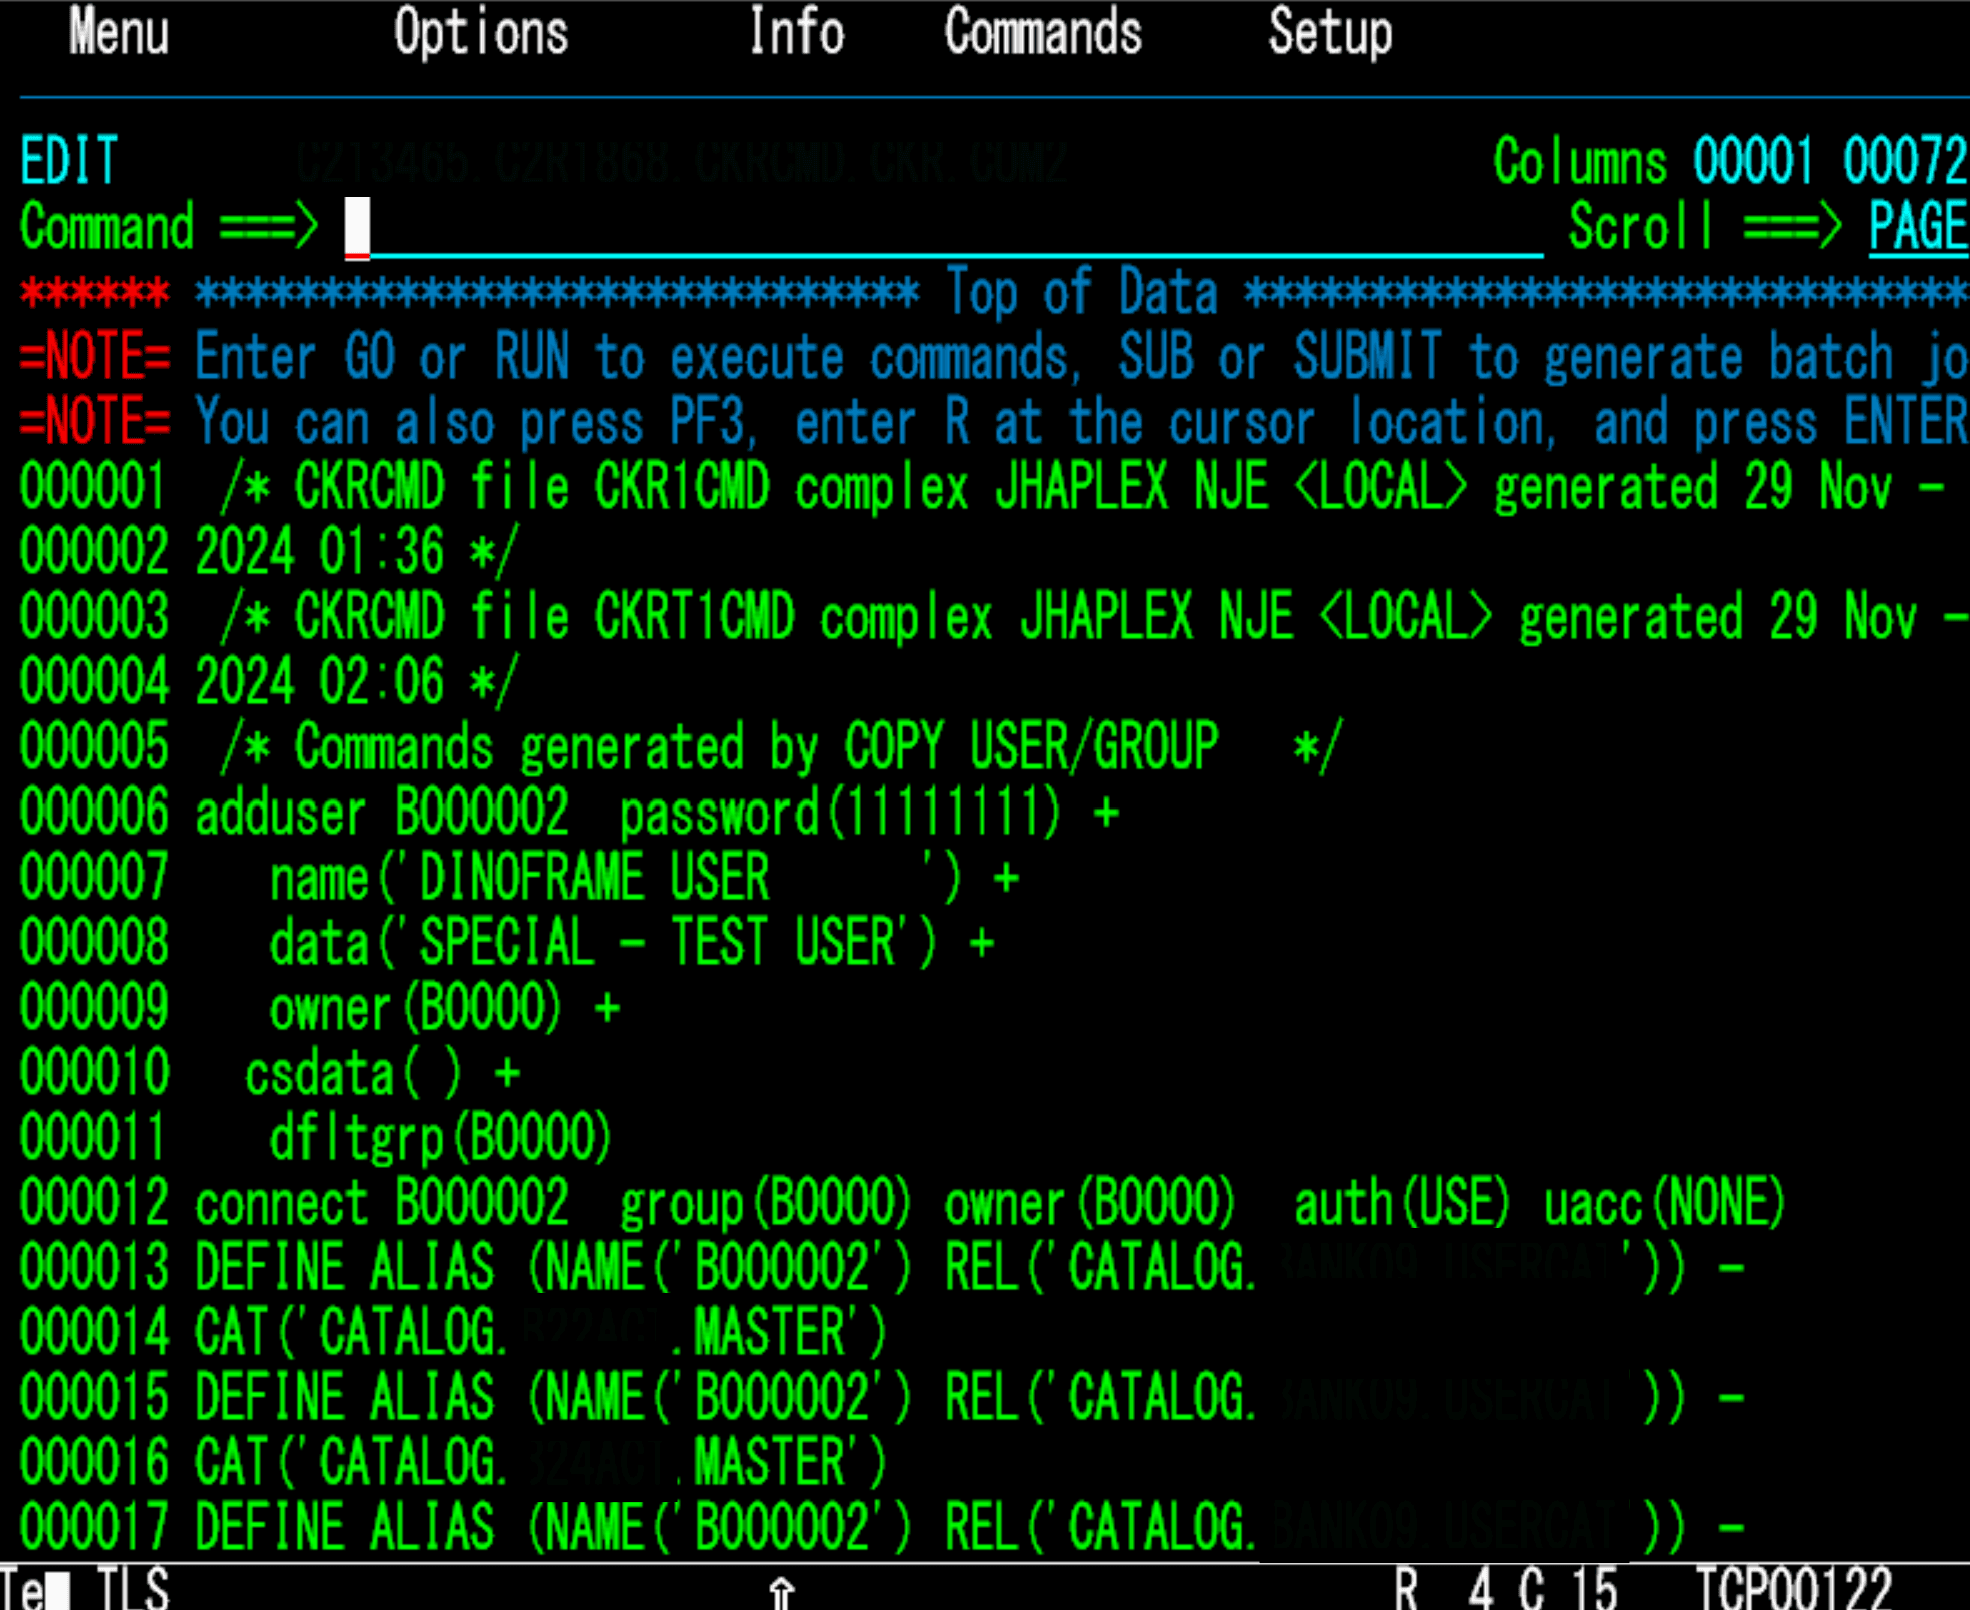
Generate Commands and Execute
You’ll return to the user ID overview screen. Press PF3 to generate the list of RACF commands needed to perform the copy.

Then type GO and press [Enter] to execute the commands.
If successful, you’ll see a confirmation screen with blue text indicating that all commands ran successfully. Congratulations—the new user ID is now created!

Resetting the Temporary Password The final step is to reset the user’s temporary password so they can create their own secure password upon first login. There are two ways to do this:
Option 1: Use zSecure
Type RA.Q for Quick Admin and press [Enter].
Select 1 to modify a user ID and enter the new user ID.
Input the temporary password in the "New Password" fields and press [Enter].

Option 2: Use RACF Commands
Go to ISPF and type 6 on the command line, then press [Enter]. Enter the following command:
ALU [USERID] PASS([PASSWORD]) RESUME


For example:
ALU B000002 PASS(BANK1234) RESUME
Final Steps Share the new user ID and temporary password with the user. Upon first login, they’ll be prompted to set their own password via the TSO login screen.
And that’s it! You’ve successfully created a new user ID using zSecure. This streamlined process saves time and ensures consistency across your organization. If you found this guide helpful, consider exploring other features in zSecure to further enhance your mainframe security workflows.
Share on social media


